Accurate Latitude and Longitude coordinates are the foundation of any effective Geo Fencing setup. Whether you are configuring boundaries for the first time or expanding an existing setup, you need reliable coordinates for every location you want to allow.
This article covers four practical methods to retrieve coordinates, each suited to a different situation.
- Google Maps for quick lookups when you know the location.
- Asking employees to punch from a target location when you can send someone to the location physically.
- Exporting existing punch data when Mobile Based Attendance has already been in use.
- Reviewing employee requested coordinates when employees themselves flag new locations they need access to.
This article is meant for administrators involved in Geo Fencing setup or expansion.
Method 1: Using Google Maps
Google Maps is the fastest way to get coordinates when you already know the address of the target location.
Steps:
- Open Google Maps in a browser.
- Search for the target address, or navigate to the exact spot on the map.
- Right click on the location. A small menu appears with the coordinates displayed at the top.
- Click the coordinates to copy them to your clipboard.
- Paste the values into the Latitude and Longitude fields on the Geo Fencing configuration page.
Example: For a corporate office, right click on the building on Google Maps. The coordinates appear as a pair (for example, 19.0759837, 72.8776559). The first number is the Latitude, and the second is the Longitude.
This method works well for offices, branches, and known client sites where the address is available.
Method 2: Asking Employees to Punch from Target Locations
If you have employees who can already mark Mobile Based Attendance, you can ask one of them to visit the target location and punch. The system Geo Tags every mobile punch with the exact coordinates, which you can then read from the attendance record.
Steps:
- Ask an employee to physically visit the target location.
- The employee marks attendance from the location through the mobile app.
- Go to Control Panel > Attendance.
- Locate the employee's attendance record for the day.
- Click on the mobile icon next to the punch to view the exact Latitude and Longitude.
- Copy the coordinates and use them in the Geo Fencing configuration page.
This method is useful for locations where the address is unclear, or where the physical entry point differs from what the map shows (for example, a factory gate that is different from the main office block).
Method 3: Exporting Existing Punch Data
If Mobile Based Attendance has been in use for a while, you can export the punch data along with Geo Coordinates. This shows you exactly where employees have been punching from, which is helpful when you are setting up Geo Fencing for the first time and want to base your allowed locations on actual usage patterns.
Steps:
- Go to Control Panel > Attendance.
- Click the Import dropdown menu and select Export.
- On the export page:
- Choose Punches as the format.
- Tick the checkbox for Geo Coordinate.
- Apply any necessary filters, such as date range or departments.
- Click Download to export the report.
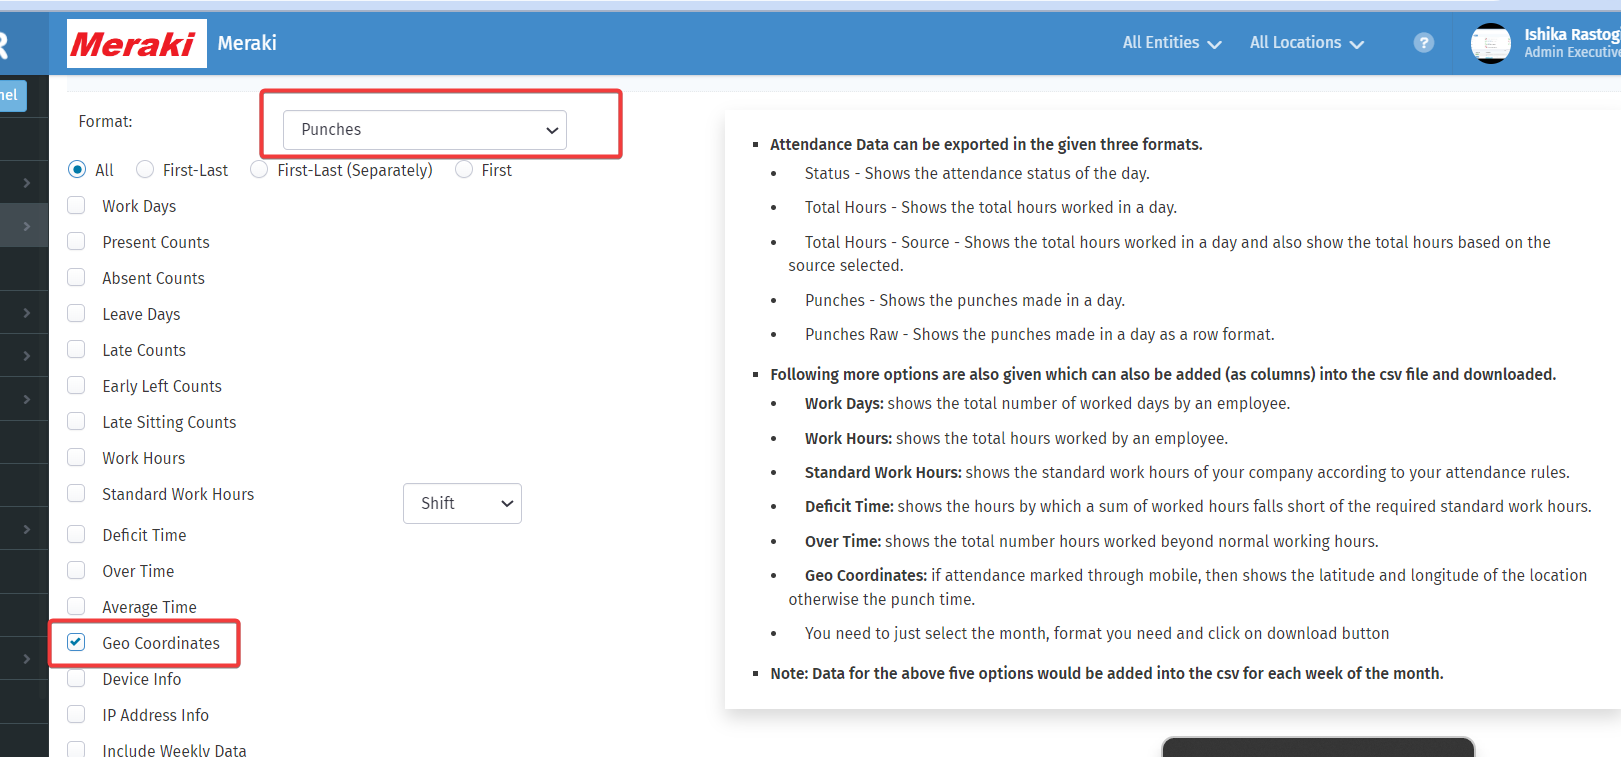
The exported file contains punch records along with the associated coordinates. Review the data to identify the locations your employees are punching from, and use those coordinates to configure Geo Fencing.
Example: A company reviewing three months of punch data notices that most Sales team punches cluster around three specific city coordinates. These three become the base for the Sales team's Geo Fencing setup.
Method 4: Reviewing Employee Requested Coordinates
Once Geo Fencing is active, employees who try to punch from a location outside the allowed boundaries see an error. The mobile app gives them an option to request that this location be added to the allowed list. All such requests appear on the Requested Coordinates page for admin review.
Navigation Path: Control Panel > Settings > Attendance > Configure Attendance
Scroll to the Mobile Attendance section, click Configure Geo Fencing, and then click the Requested Coordinates button on the Geo Fencing configuration page.
What the Requested Coordinates page shows
The page lists all pending coordinate requests raised by employees, with the following details:
- Emp Code: The employee's identifier.
- Employee: The employee's name.
- Latitude and Longitude: The coordinates captured when the request was made.
- Address: The address associated with the coordinates.
- Requested: The employee who raised the request and the date.
- IsAdded: Whether the request has been added to allowed coordinates.
- Action: Icons to preview, add, or delete the request.
Steps to review a requested coordinate
- Preview the location. Click the preview icon (globe) in the Action column to see the location on Google Maps. This helps confirm the request is valid before approving.
- Approve the request. Click the add icon. A form opens with the Latitude, Longitude, Radius (defaulted to 50 meters), and Address prefilled. Enter a Title and optionally a Description, then click Yes to save.
- Reject the request. Click the delete icon. Confirm the deletion in the prompt that appears. The request is removed from the queue.
Once approved, the location becomes part of the Allowed Coordinates list and works like any other configured Geo Fencing location.
Example: A field sales executive travels to a client site not currently in the allowed list. They try to punch and see the error. Through the mobile app, they request the location be added. The admin reviews the request, previews it on Google Maps to confirm it is a genuine client site, and clicks Add. The Title is set to "Client Site Gurgaon" and Radius is adjusted from 50 to 100 meters to cover the full building. Save. The next punch from that location is accepted.
Best Practices
- Verify coordinates on Google Maps before saving. Regardless of which method you use, a quick verification on Google Maps ensures the coordinates sit exactly where intended.
- Use meaningful titles. Descriptive titles like "Mumbai Head Office" or "Client Site Bengaluru" make it easier to review and manage locations, especially when the list grows.
- Use adequate decimal precision. At least 7 decimal digits are recommended for accuracy, and the system supports up to 14.
- Adjust radius by location. Larger campuses and buildings need a wider radius. Small offices or client rooms work with a tighter radius. GPS accuracy of employee phones also affects the right choice.
- Communicate additions to employees. When new locations are added (especially from approved requests), let the relevant employees know so they know they can now punch from there.
Related Configurations
- Configure Geo Fencing for Mobile Attendance. Once you have the coordinates, use this article to configure them into your Geo Fencing setup. Refer to Configure Geo Fencing for Mobile Attendance.
- Geo Fencing Overview. Understand what Geo Fencing is, how it works, and how to get it enabled. Refer to Geo Fencing Overview.
- Set Up Mobile Based Attendance. Geo Fencing and coordinate retrieval both rely on Mobile Based Attendance being enabled. Refer to Set Up Mobile Based Attendance.
Important Notes
- Coordinates must be accurate for Geo Fencing to work reliably. Small errors in Latitude or Longitude can cause valid punches to fail or unintended locations to be accepted.
- All four methods produce coordinates in the same Latitude and Longitude format, which can be used directly in the Geo Fencing configuration form.
- Currently, no notifications are sent to employees when their requested coordinate is approved or rejected. Communicate outcomes to employees separately if needed.